Home / Plugins / WordPress / Miscellaneous
Advanced Store Locator Maps - WordPress PluginAdvanced Store Locator Maps - WordPress Plugin
ASLM allows you to easily add multiple Google Maps with multiple business locations, Fully CustomizableHome / Plugins / WordPress / Miscellaneous
Advanced Store Locator Maps - WordPress Plugin
ASLM allows you to easily add multiple Google Maps with multiple business locations, Fully Custo...
Screenshots


Overview
See it in action! Explore all map styles, business listing layouts, and interactive features directly on the live demo. Instantly experience real search, filtering, and responsive maps as your customers will see them.
📖 Documentation
Easy Setup & Step-by-Step Guides:
- How to install and activate the plugin
- How to create your first map and add locations
- How to set up your Google Maps API key
- Customizing map styles, pins, and layouts
- Embedding maps using shortcodes in any editor or widget
- Advanced options: responsive design, sidebar controls, and more
- Troubleshooting and FAQs
Advanced Store Locator Maps (ASLM) lets you easily add multiple Google Maps to your WordPress site, each with unlimited business locations, custom pins, store images, phone, and details—all with a modern, mobile-friendly design.
🚀 Features
- Create unlimited maps and add unlimited locations to each
- Custom or built-in PNG pin icons for each business
- Show store images, phone numbers, rich business details
- Modern, mobile-ready sidebar and map design
- Show/hide location list, images, phone, or details
- Copy-paste shortcode for easy embedding anywhere
- Google Maps API integration (quick setup)
- Works with all themes and major page builders
- Clean, non-conflicting CSS/JS
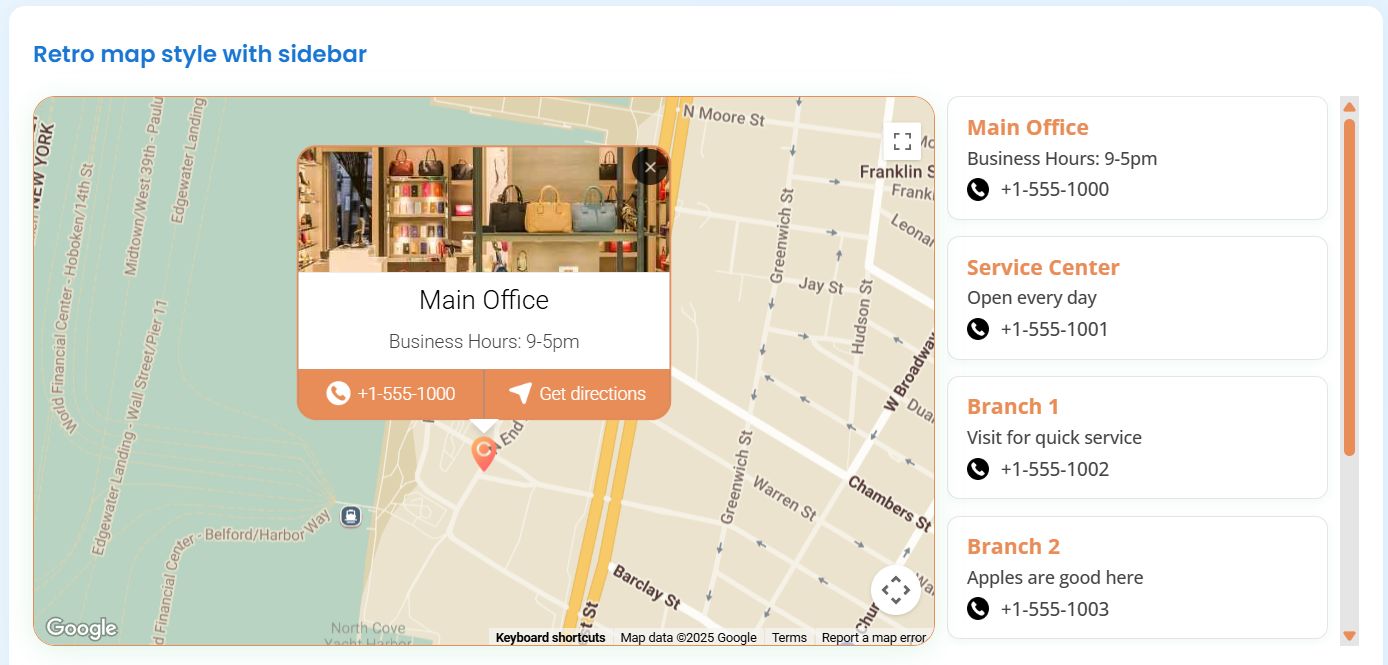
🗺️ Available Map Styles
Available Styles: Default, Silver, Retro, Dark, Night, Aubergine, Black map, Nature blend, Urban ice, Brown, Graphite grid, Green, Watersheds, Modest, Cloudline, Grayscale, Grayscale current, Yellow
🔧 Getting Started
- Upload & activate via Plugins → Add New in WordPress.
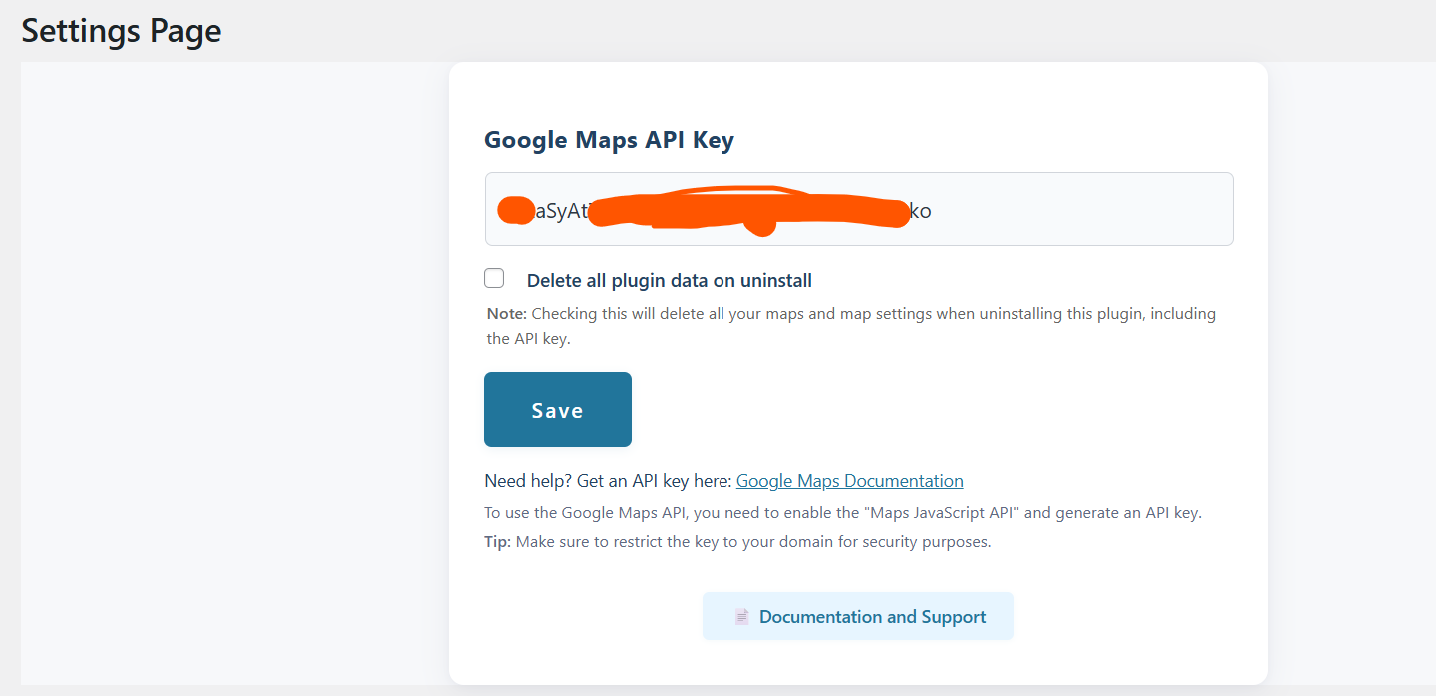
- Open Maps → Settings in your WP admin menu.
- Add your Google Maps API key (see below).
- Create your first map and add locations/businesses.
- Copy and use the map shortcode anywhere!
🔑 Google Maps API Key
You need a Google Maps API key to display maps.
- Go to Google Cloud Console and enable Maps JavaScript API.
- Generate your API key and paste it in plugin settings.
Tip: Full API setup steps are in the documentation above.
🗺️ Create & Manage Maps
- Go to
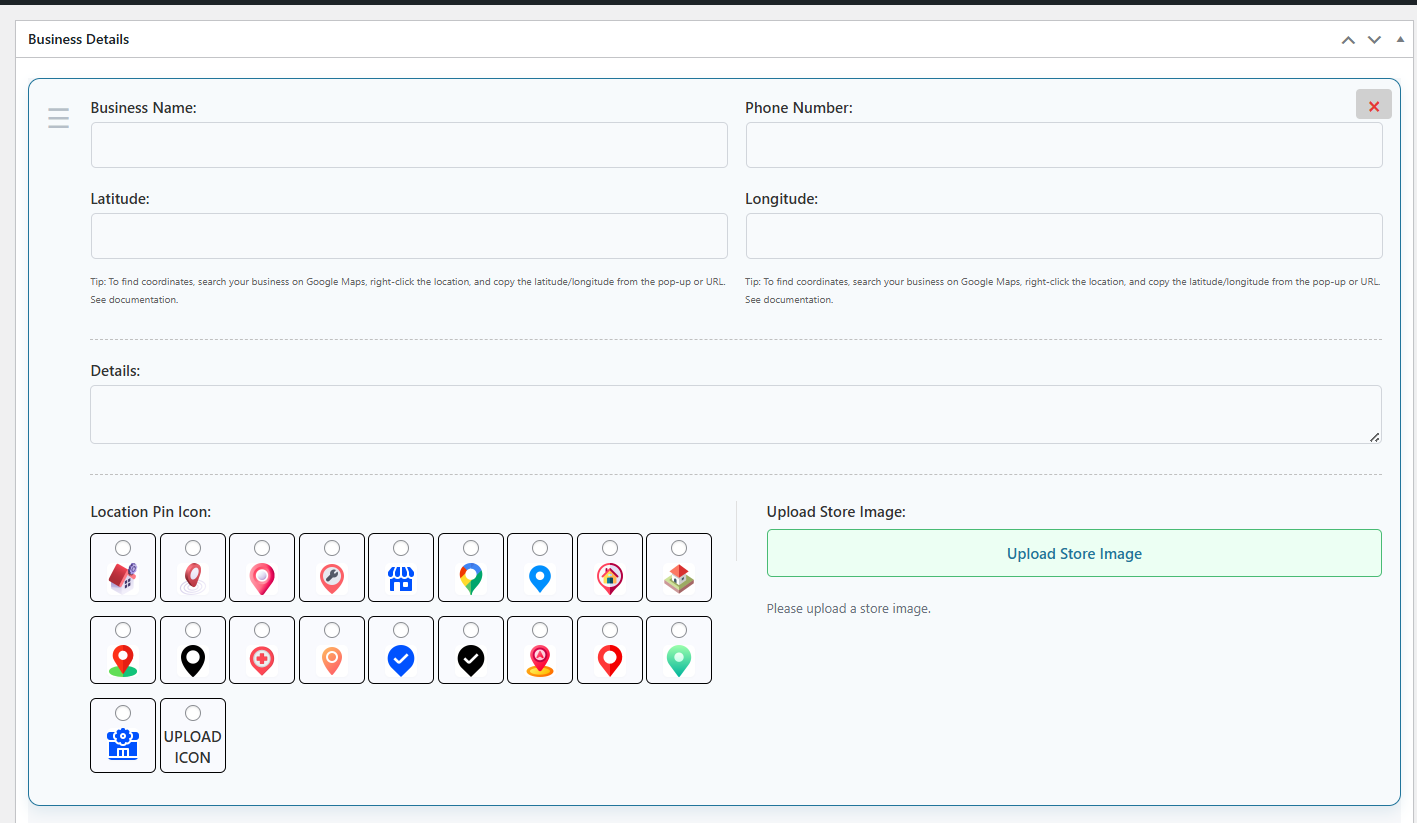
Maps → Add Newin WP Admin. - Enter a map title and add businesses (with name, coordinates, phone, details, custom icon, store image).
- Customize map style, sidebar, details, and more.
- Click Publish to save your map.
🧩 Shortcode Usage
Display any map with:
<code>[store-locator-map id="123"]</code>
- Replace id with your map’s real ID (see Maps list).
- Embed on pages, posts, widgets, any editor (Gutenberg, Elementor, etc).
📝 Notes & Tips
- Use unique PNG icons for each pin (or select from built-in).
- Upload a store image for every business location.
- Add unlimited locations to any map.
- Shortcode works everywhere — pages, posts, widgets, builders.
- Test API key after saving in settings for maps to appear.
🛠️ Troubleshooting
Map Not Loading?
- Check your API key and billing status in Google Cloud Console.
- Clear plugin/browser cache.
- Ensure Maps JavaScript API is enabled.
Custom Pin/Image Not Showing?
- Make sure image URLs are correct and accessible.
- Use transparent PNGs for best results.
Need help?
Thank you for choosing Advanced Store Locator Maps!- Contact our support team via our support page.
- We respond quickly to all pre-sale and technical queries.
https://excellentweb.agency/plugins/advanced-store-locator-maps/
Features
- Create unlimited maps with separate business locations
- Add unlimited locations/markers to each map
- Use built-in or custom PNG pin icons for each business
- Upload and display a store image for each location
- Custom business name, phone number, and rich details, custom pin icon for each pin
- Show/hide location list sidebar, store images, phone, or details
- Copy-paste shortcode for easy embedding anywhere (pages, posts, widgets)
- Google Maps API integration with easy setup
- Responsive and mobile-friendly layout
- Modern, non-conflicting CSS/JS
- Works with all themes, all page builders
Requirements
**Tested up to:** WordPress 6.5
**Stable Version:** 1.0.0
**Requires PHP:** 7.0+
Instructions
🔧 Getting Started
1. Install the Plugin
- Go to your WordPress dashboard.
- Navigate to Plugins → Add New.
- Upload the plugin ZIP file.
- Click Install, then Activate.
2. Configure the Plugin
- After activation, go to your site’s backend: Maps → Settings (or look for “Maps” in your admin menu).
🔑 Google Maps API Key
You need a Google Maps API key to display maps.
- Go to Google Cloud Console.
- Create a new project or select an existing one.
- Enable Maps JavaScript API
- Generate an API key.
- Copy and paste it into the Google Maps API Key field in the plugin settings.
🗺️ Creating & Managing Maps
- Go to:
WordPress Admin → Maps → Add New - Enter Map Details:
- Map Title (for your reference)
- Locations/Businesses:
- Click Add New Business and fill out for each:
- Business Name (e.g. “My Store”)
- Latitude, Longitude Tip: Search your business on Google Maps, right-click, and select ‘What’s here?’ to copy coordinates, or copy from the URL/info box.
- Phone Number (e.g. +1-888-555-4566)
- Details (description, open hours, etc.)
- Pin Icon: Pick from built-in icons or upload your own (transparent .png recommended)
- Store Image: Upload a photo (optional)
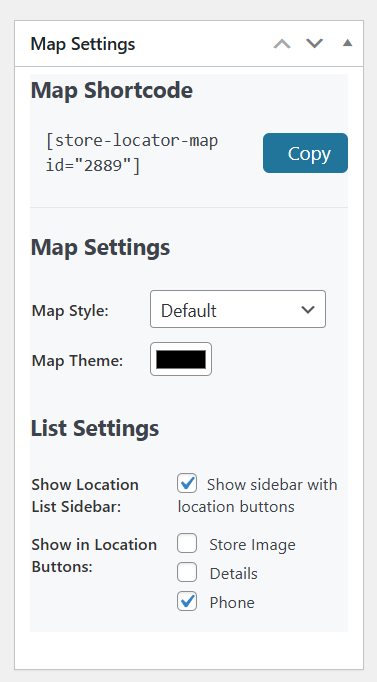
- Map Settings: Choose map style, accent color, toggle sidebar/list, and what details to show in sidebar button.
- Use Shortcode -
[store-locator-map id="123"]
Information
| Category | Plugins / WordPress / Miscellaneous |
| First release | 2 June 2025 |
| Last update | 3 June 2025 |
| Supported CMS | WooCommerce 3.0.x, WordPress 6.8 |
| Files included | .php, .css, .html, Javascript .js |
| Tags | store locator, google maps, markers, store finder, advanced store location maps, advance google map, maps listing, store locator map with sidebar, wp advanced google maps, wp google map, wp google maps, wp maps, wp maps listing, wp maps pro, wp store locator |